

When it comes to drawing, one of the most important elements is building contrast. Your drawing is instantly more eye-catching when you create depth. Shadows and highlights are especially important in portraits as these really bring life to a face. Correct placement of these shadows and highlights are often experienced as difficult for beginning artists, so that’s exactly why we’re going to focus on that in this article. To draw shadows correctly, you need to ‘understand’ the shadow :P. I know that sounds a bit strange, but you need to know why a shadow forms and how they’re influenced by other objects or light sources. First, let’s start with the basics!
Different types of shadow
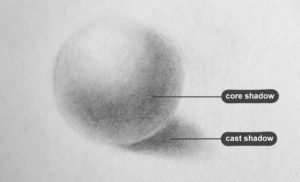
We can distinguish two kinds of shadows (Figure 1).
1. The form shadow or core shadow is the shadow that is present on the object itself, where the light reaches the object the least. This shadow creates volume and shapes the object.
2. The cast shadow is the shadow that is cast on another surface. It is “attached” to the object itself. A good example of a cast shadow is the shadow on the ground (object = you, surface = ground) when you walk outside on a sunny day. This shadow gives the object physical presence.
The formation of shadows
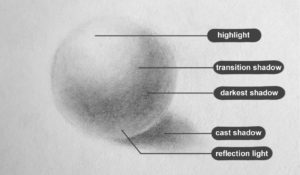
Shadows are formed when natural (such as the sun) or artificial light (e.g. from a lamp) hits an object. On the location receiving the most light, a highlight will form (figure 3). The darkest shadow will be formed where the light can not reach. A transition shadow connects the highlighted and dark area creating a gradient of grey tones that becomes darker towards the darkest shadow. Furthermore, we often see a lighter spot along the cast shadow: the reflection light, which is formed as light bounces off the surface back onto the object.
Shadows are influenced by light sources. As light shines on an object, it creates a shadow. Whenever I’m drawing, I try to keep two important factors in mind that will influence shadow formation: the angle of the light source and the shape of the object.
The angle of the light source
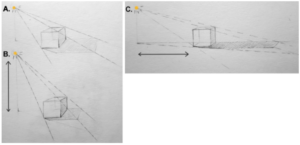
The angle at which the light hits an object determines how shadows fall. This angle is influenced by the height and distance of the light source to the object (illustrated in figure 3). When the sun is directly overhead, our cast shadows will be short, whereas at sundown the opposite is true. When we talk about artificial lighting the distance between the light source and object becomes also important. Here the distance and the angle are interconnected. The greater the distance, the larger the area on the object that is illuminated and the larger the casting shadow will be.
Depth created by shape
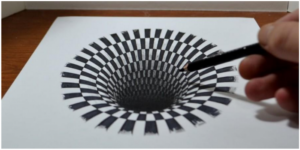
Most of the light will hit the area of the object in the closest proximity to the light source. The more difficult it gets for the light to reach, the darker the shadows are. This means that also the shape of the object is an important factor, and a shadow can give the illusion of optical depth. When you look into a hole or deep tunnel the light slowly fades as you distance from the light source (get deeper in the tunnel). You can use this example when you think of drawing. For example when you draw hair: the closer you get to the scalp, the darker the shadow will become. The same way, you can create illusions mainly using contrast. This is illustrated in “the 3D illusion on paper” drawn by Jonathan Harris (figure 4).
Drawing shadows and light – in practice
Now you’ve read and understood a bit more how and why shadows are formed, we can talk about how to use this knowledge while drawing. We will explain this using an illustration of a nose you find below (figure 5). You can think of this nose (or object in general) to be built from several smaller ‘basic’ shapes (such as ball, pyramid, cube, cylinder etc.). For example, the tip of the nose can be viewed as a ‘ball’. The nose is lit by a light source from the left, leaving a highlight high on the left side of the nose. The right side of the nose is hardly reached by the light, creating a dark shadow. A cast shadow from this ‘ball’ is formed on top of the right nostril and directly under the nose, creating an even darker shadow here. Also, remember that these nostrils are closer to the face than the tip of the nose, therefore they are portrayed darker. The darkest shadows are formed in the nostrils, the light can barely reach this (also remember the ‘tunnel’ example).

Some additional tips
Creating an atmosphere
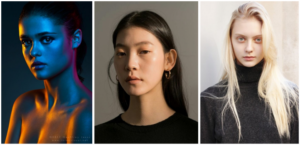
Shadows, light and overall contrast are very important to create a certain atmosphere in your artwork. What story is told through your art? Is it a mysterious scenario lit by a dimmed oil lamp? A cheerful portrait in broad daylight, or a beautiful summer night at the beach? All these settings require different lighting. To illustrate this further you can look at some example pictures below: the picture at the left is shot in a dark room with artificial lights, it gives off an underground vibe, like a night discotheque. The picture in the middle is made using natural lights (or a warm artificial light) coming from the right. The strong contrast and warm tones make it feel as if this picture was taken at the end of a sunny afternoon. The far right picture is created with indirect natural lights, this time there are no harsh shadows.
Consistency
Keep your light direction consistent within the whole artwork. After choosing kind of light source the distance and its angle, keep this consistent! Otherwise, this will give an unbalanced look.
Material and texture
And last but not least, don’t forget to take into account the material of the object. Light will reflect differently on a woollen sweater than on metal. However, we will not further discuss this in this blog, but a bit of research and reference pictures can be helpful for this!
Drawing lights and shadows correctly will help you take your drawing to the next level. Your artwork will look more interesting and more expressive. I hope this blog has helped you to understand why and how shadows form and how to implement this in your work. If there are any questions to hesitate to ask them in the comments below!
Good luck!
Love, Annelies
1 comment
alan dawson
2 October 2020 at 21:43Do you think that the area which you are calling transition shadow,is best thought of as more of a shadow than a light ,i know in a way it is neither .but i have always thought of that area as a light,but im beggining to think it is best to think of it as more of a shadow.i used to see someones demmo of lighting on a ball and they would point out the area of transition, and call it shadow, and i used to think that is totally wrong. now im beggining to think there is some thing in this, Anyway yours, and only say 2 others have refered to this area as shadow .i hink it is great of you to do this .it kind of makes more sense to think of this area as more of a shadow ,would it be shade then it goes into core shadow ?any wayThankYou for this.Alan