
You might be a fanatic draughtsman and like to share your work and work in progress pictures with your followers. Undoubtedly you’ve got the question: Do you want to record a tutorial? Do you have a YouTube channel with speed drawing videos?
If you’re anything like me, you prefer to avoid these questions as long as possible. For the reason that I didn’t know how to film from above. A stand for filming from above can be quite expensive, and it does not fit my student budget. In addition, many DIY camera stands do not have the capacity to hold a heavy camera.
I did end up making my own cheap and easy stand, in this tutorial I will show you how you can make your own!

What do you need?
- A long PVC tube (which you can cut into pieces according to your own wishes)
- Three corner pieces
- Two T pieces
- Two closures
- A screw that fits your camera (this allows you to turn your camera on this screw so it fits)
- PVC glue
I have chosen a slightly thicker tube to keep the strength. There is a chance that if you choose a thin PVC tube, the standard will lose its strength and fall over.
How to make your own stand?
To start with, cut the long PVC tube into preferred shorter lengths. Adjust the measurements and the size according to the height you want to work at.
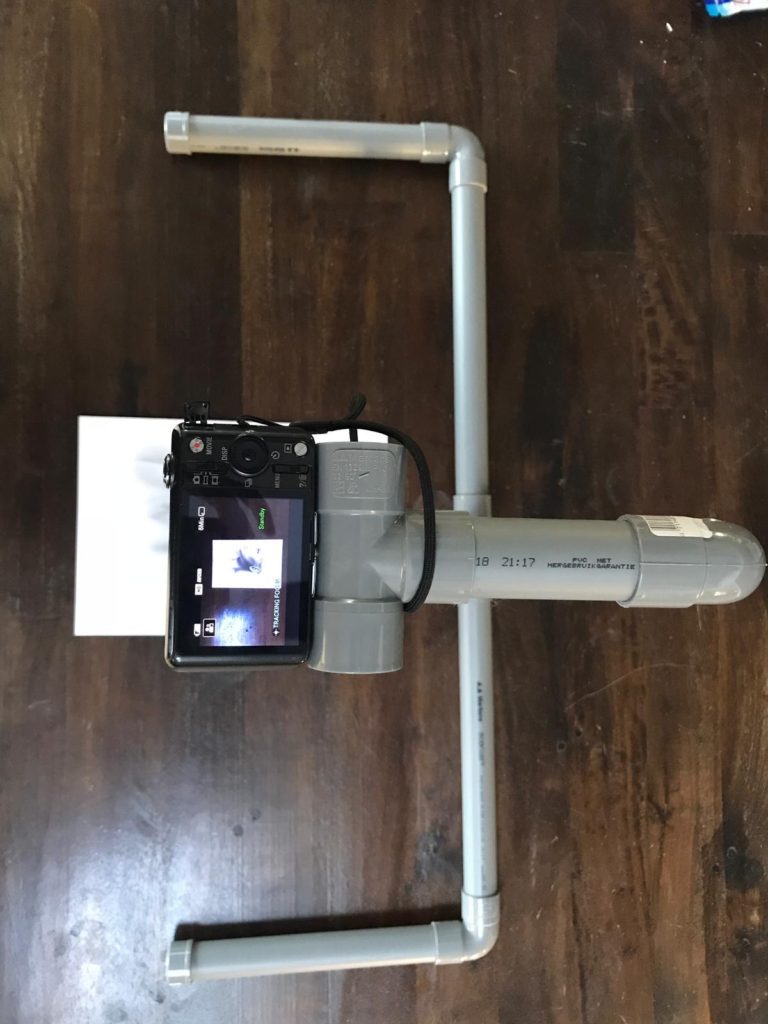
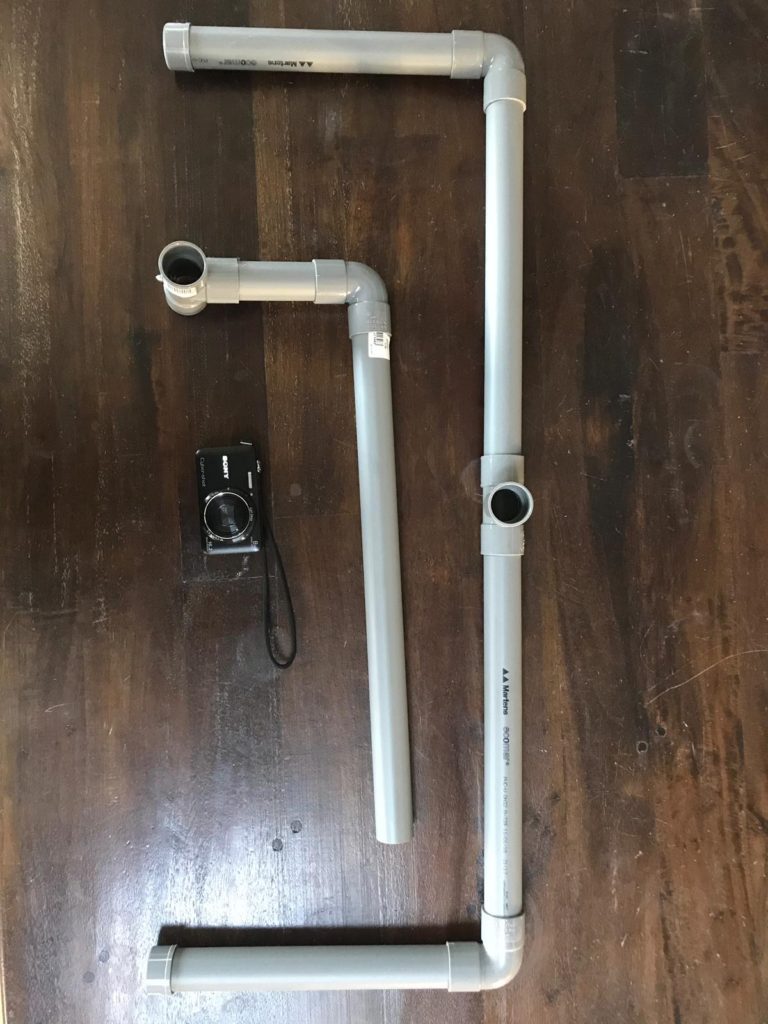
The total width you need to work in is divided by two, these are the first tubes, tube A and tube B. The tubes in the length of the video stand are called tubes C and D. The tube in the height is called tube E and the tube to which the camera is finally attached is called tube F. So in total you need 6 tubes.
The measurements of my own standard are as follows:
Tube A and B are both 35 cm long
Tube C and D are both 26 cm long
Tube E is 46 cm long
Tube F is 11 cm long
So all I used was one PVC tube of 2 meters long, and sawed this into smaller pieces.
The tubes are attached using PVC glue, this will prevent it from falling apart. First attach tube A and C together and tube B and D. This holds in the two ‘arms’ of the stand. If you have these two arms you can put the T-piece in between, make sure that the remaining opening of this piece is straight up, otherwise your camera will not have a straight image down.
This was the first part of the stand, you don’t have to adjust these parts anymore.
We will now start with the second part of the stand. First take the T-piece you have left, and drill a hole in the straight part, and place your screw through it. Then attach tube E, the corner piece and tube F to make one piece out of it.
Now you can put the first and the second part together, do not glue them however. This way you can remove the parts for easy storage.
Keep in mind that you will film your project upside down. Before editing you have to rotate the footage.
Editing your video
Once you’ve created your video, it’s time to start editing it. You have several programs to work with in the field of video editing. Personally, I think a lot of these are too complicated with too many options. I edit my videos in Moviemaker myself. Moviemaker allows you to speed up videos up to 16x, rotate your video, adjust the exposure and add music and comments to your video, this is enough for me. Besides that, the program is not heavy to run, so my laptop can handle this very well (unlike other video editing programs).
What I do by default with editing my videos is to insert all media files chronologically. After that I speed it up so that I end up with a video of about 2.5 minutes. It is better to keep your videos short because they are watched better than long videos. Afterwards, I cut out the parts where I do nothing for a moment or am busy with something else than drawing, the short breaks.
Once I have done that, I look for good music for the background of the article. Please make sure that the music is royalty free, otherwise the music can be blocked by YouTube and your viewer will not have any music in the background.
All I have to do now is save my video in HD, do make sure you don’t click ‘for computer’ as a save option in Moviemaker. Otherwise the video will be of very poor quality and not easy to watch. And it is ready to go up on YouTube!
The result
The result of such a video, with this video stand, is shown below:
https://www.youtube.com/watch?v=nVY-2ckIGSA
Good luck making your own speed drawing videos! Did you try this DIY? Show us the result! You can tag us on Instagram: @Vincentvanblog
No comments yet. Be the first one to leave a thought.