
How to draw an eye?
For this blog post I thought it would be nice to go back to the basics of portrait drawings: the eyes. You can also see this blog as an addition to Annelies’ article, namely: how do I start drawing portraits? In this article, we focus on what really makes a face expressive: the eyes. They are not called ‘mirror of the soul’ for nothing.
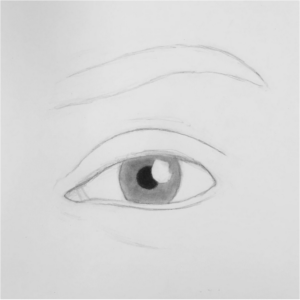
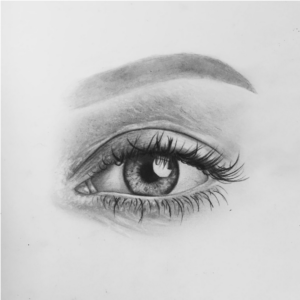
For this tutorial I used the following reference photo:
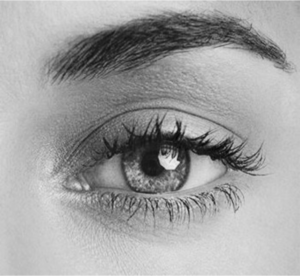
The photo is quiet, front-sided, fairly sharp and without too much make-up.
Materials:
For this tutorial I used the following materials:
- Mechanical pencils: HB 0.7 mm, 1B 0.3 mm and 2B 0.5 mm
- Erasing: Faber Castell pencil eraser and Tombow mono eraser
- Signo uniball fineliner
- Canson Bristol paper
- Blending products: stumpers, cotton swabs and tissues
Even though there are many art materials available, after more than 10 years of drawing, I found out that the materials listed above work the best for me. These are the materials that I use for every black and white portrait. I definitely recommend using similar materials. Especially thick paper, a mechanical pencil and a gum pencil will give a lot of improvement in your drawings. On thick paper you can build more layers, and with a mechanical pencil and a pencil eraser you can work much more detailed because of their thin points.
We divide the process of drawing an eye into four parts:
- The eye itself
- The skin
- The eyelashes
- The eyebrow
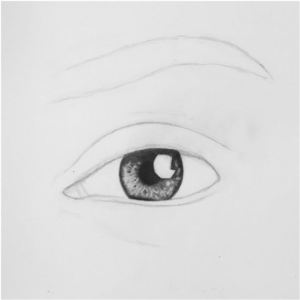
The eye
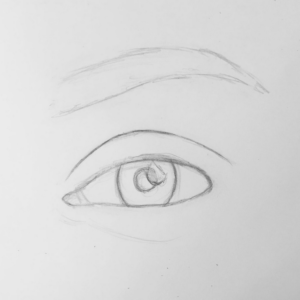
Step 1: The alignment and shape of the eye and the eyebrow
A drawing actually consists of two parts: sketching and coloring. It is therefore important that you have the basis sketch on paper first. Try to trace your reference picture as a kind of coloring picture for yourself. Ask yourself: ‘Which lines are important and will I use during the process of coloring?’ It is mainly about the base: the eyelid, the tear duct, the pupil, the iris, the eyebrow shape and the highlights. The highlights in the eye are usually a reflection of light from the environment (such as a window). Often you can see some eyelash hairs as a shadow that block the light. For the sketch it is useful to use an HB-2B pencil so that you do not make the lines too dark, as you also do not want the sketch to be visible in the end.
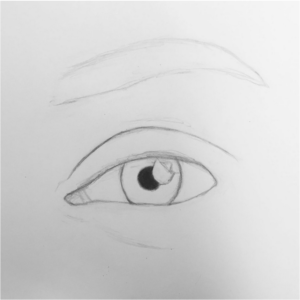
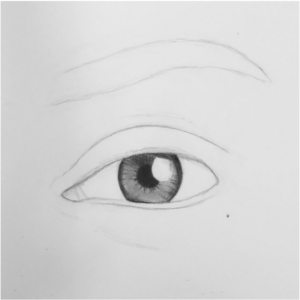
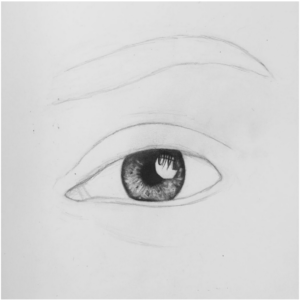
Step 2: Coloring the pupil
If you are satisfied with your sketch, you can start to colorize after erasing unnecessary lines. I always work from the inside out because you can apply corrections even better if necessary (especially the proportions). Color the iris carefully tight and dark. You get the best result by working in layers. Color the iris, wipe the pigment with a stumper and color another layer over it. Continue until it is evenly dark gray. It is important that you do not fill in the reflections with pigment already. If these remain white you will eventually get a much nicer contrast and a shiny effect. The coloring of the pupil can be done with a softer pencil. I use 2B myself but as long as you work softly and in layers you can also use up to a 6B pencil.
Step 3: Shaping the iris
The iris is an area with a lot of depth and details. Both dark and light shades are close together. It is therefore important to have gray as your basic tone. Later on you can draw over dark areas and erase light details. Personally, I achieve the softest colored result using a stumper. So actually you fill in the iris with the graphite that is still on your stumper (mine are always dirty). To make sure that your stumper does not leave any nasty stains, I first wipe off the first layer of graphite that is still on, on a loose sheet of paper. I always color with my stumper by making circular movements. Continue until your iris is evenly light gray. Do not forget to keep your highlights in your iris and pupil white.
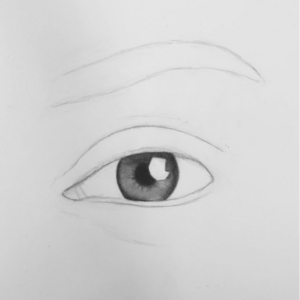
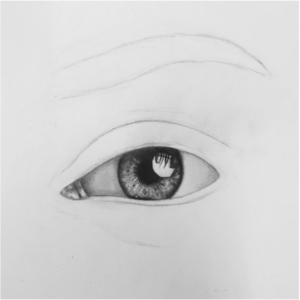
Step 4: Drawing lines in the eye and accentuating the forms of the iris
The edge around the iris is almost always darker than the rest of the eye because of shadows and a higher density of structures in the eye. At the top of the iris (against the eyelid) there is almost always a shadow present. We are now going to draw extra shadows over the iris that we have just colored. To build up solid saturations for your shadows, I will advise to work in layers and to use a soft pencil (2B-4B). You apply the shadow with gentle sketching movements while pressing the pencil on your paper. This gives you a nice blended effect with nice contrast.
Furthermore, we will work on the lines in the iris. They scatter out of the pupil like a kind of sun, as well as from the edge of the iris. It is important that you draw different lines. Think of thin and thick lines but also light and dark lines. This gives a more realistic appearance. Build up the lines again. Spontaneous sketching lines often look more realistic than very straight lines.
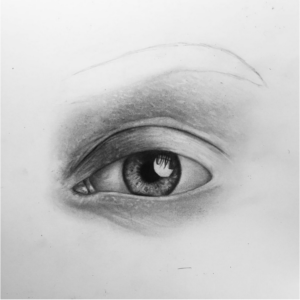
Step 5: Blending lines and shadows
To make everything look nice and smooth, we will blend everything softly. For this you can use both a stumper and a cotton swab. You will see that some dark lines become more blurred. This can be fixed by re-drawing certain lines. As you may notice, we are drawing in layers again. There are no guidelines for how many layers are needed. This is a matter of continuing until you see a nice contrast, but everything also nicely overlaps. I usually need two to three layers (blending – drawing – blending – drawing – blending – drawing).
Step 6: Adding highlights
The nicest thing to do is to add the highlights by using a pencil eraser. This makes the eye so much more lively. Many people are always surprised that you can do so much by erasing. Erasing is actually the same as drawing for me. The only difference is that you create lines by removing graphite on your paper instead of adding graphite to your paper. You get the best result by working as precise as possible. This is possible with a pencil eraser or a Tombow mono eraser.
By looking carefully at your reference photo, you determine what kinds of shapes are present in the eye. Sometimes the lines are nicely located next to each other but eyes can also have more comples iris patterns. All eyes are different. Again, you get the best result again by gently, but precisely, erasing it. Often, I put more pressure at the beginning of a line so that it flows nicely into the rest of the iris. To create round shapes, I make a dotting motion. I repeat this until the spot becomes light enough.
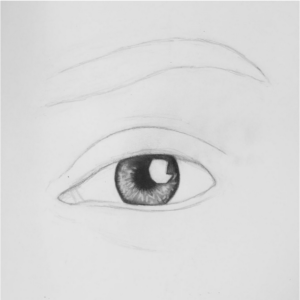
Step 7: adding the final shadows in the iris
Now that you have many highlights you will see that your eye looks a lot more realistic but also has become a lot lighter. To create a beautiful contrast, you move your pencil one more time along the darkest shadows and the sharpest edges. For example, it is nice to have a dark shade next to a white shape so that it becomes even more striking and conveys depth. Erasing and drawing shadows over it can be repeated several times until you are satisfied. You work here again with layers.
Step 8: Working out the big highlights
It is now time to work out the big highlights. This is the great reflection of light that you can see in the eye. This can be one reflection but it can also be multiple. The eyelashes can often be seen in a reflection. This is because eyelashes prevent the light from shining in the eye. This is especially true if the reflection is high on the eye. We will focus on drawing the eyelashes later on.
Step 9: adding super highlights with a white gel pen
If you like it, you can also make the lightest spots and lines in the iris stand out even more by adding highlights with a white gel pen. I always use the signo uniball for this step.
The eyeball and the skin:
Step 1: Shaping the eyeball
The eyeball is never completely white. If this were to be the case, this would look flat and unrealistic. Because it is a ball, there is almost always a shadow around the edges of the eye and light falls in the middle. Build this very gently with a 2B pencil and wipe it inwards. I do this again by working in layers. The light on the eyeball can eventually be made more visible by erasing.
Step 2: The shades of the skin
There is always shade around the eye. It is therefore important to look carefully at your reference photo. Which parts are the darkest and where does the light fall? Often light falls on the eyelid and on the tear duct and there is a shadow under the eyebrow and under the eye. In order to build up all the shadows as evenly as possible, we work again in layers. Because you do not want to make spots in the skin, everything stays clean by blending with clean tissues or cotton swabs. I often use a B or 2B pencil for this.
As a finishing touch, it is nice to erase small highlights with a pencil eraser (you often find small points of light; for example, from pores or hair follicles). I do this often by making dotting movements. Keep it subtle.
The eyelashes:
For hairs, it is the best to use a very sharp pencil. I always use my 5mm 2B mechanical pencil. With a mechanical pencil you can work in much more detail and more beautifully mimic the shape of hair. Pay attention to each individual hair, especially with the eyelashes.
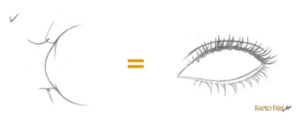
Below I will give some useful tips using illustrations:
Important to the eyelashes is that they are banana-shaped hairs and therefore certainly not straight lines. When we look at the origin and the course of the eyelashes, we see that a hair never grows straight up from the hair follicle as people often draw. Eyelashes first grow slightly forward and then grow upwards. The farther the eyelashes stand out, the more you look at it as a side view and the more bent they are. Below I will show an example:
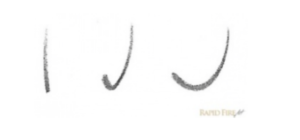
The incorrect but widely used way:

The correct way:
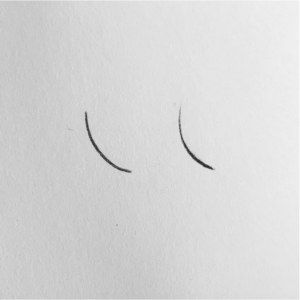
Eyelashes from different views:
Eyelashes are the thickest at the origin and become thinner towards the end. This is why you put the most pressure at the origin and less at the end of the eyelash.
An eyelash drawn by putting the same pressure everywhere or by gradually reducing the pressure.
Make your eyelashes more realistic by varying in length and thickness. All eyelashes do have a different lenght. Often, I start with a few long lashes and I use the smaller thinner hairs to fill everything up.
Eyelashes also overlap. Take a good look at your own lashes.
Step 1: Determine the direction of the eyelashes.
Start by drawing a number of long eyelashes spread over the lash line to determine the direction and curve. After that, it is easier to place the other lashes in between.

Step 2: Completion
If we have drawn a few hairs that indicate the direction in each area we can draw more lashes in between them. Do not forget that the direction and bending is a guideline. There are always lashes between them that do not run perfectly. Play with length, thickness and direction.
Step 3: Small eyelashes
We fill the lash line even more by drawing small hairs. They often stick to other eyelashes. Keep this in mind.
The eyebrow:
With eyebrows a lot is the same as with the eyelashes. Eyebrow hairs are also thicker at the origin and end in a sharp point.
Step 1: The alignment
Normally this step would be: ‘drawing the outline’ but we have already done this at in the beginning of this tutorial.
Step 2: Basic color
Color the alignment shape very light gray. This provides a nice base for adding hairs later on and making it whole.
Step 3: Hair direction
Start as with the eyelashes with a few eyebrow hairs in each area. Look carefully at the hair direction. At the start, the hairs run from the bottom to the top, then horizontally and on the outside more from the top to the bottom.
Step 4: Completion
Fill your eyebrow with hair. Keep track of the origin and the direction, but do not be afraid to keep variation. Especially in men, we see that the hairs run in random directions. A neat and predictable eyebrow hair pattern looks unrealistic. So keep track of the growth direction per zone but also play something with some hairs.

Step 5: Blending
To make the eyebrow a little less rough, I often go over it with a stumper. Also here I recommend to work in layers as some hairs will fade when you start blending. Continue blending and drawing until you have found a nice balance between softness and contrast.
Step 6: Finishing touch
If everything is neatly on paper and you are satisfied with the eyebrow, it’s time to zoom in. Are there dark spontaneous hairs that you have forgotten? Are there some extra highlights to be found? In most cases there is sometimes some light glimmering on some hairs. You can replace the hairs in a few places with some erased lines. This way, your eyebrow gets so much extra depth.
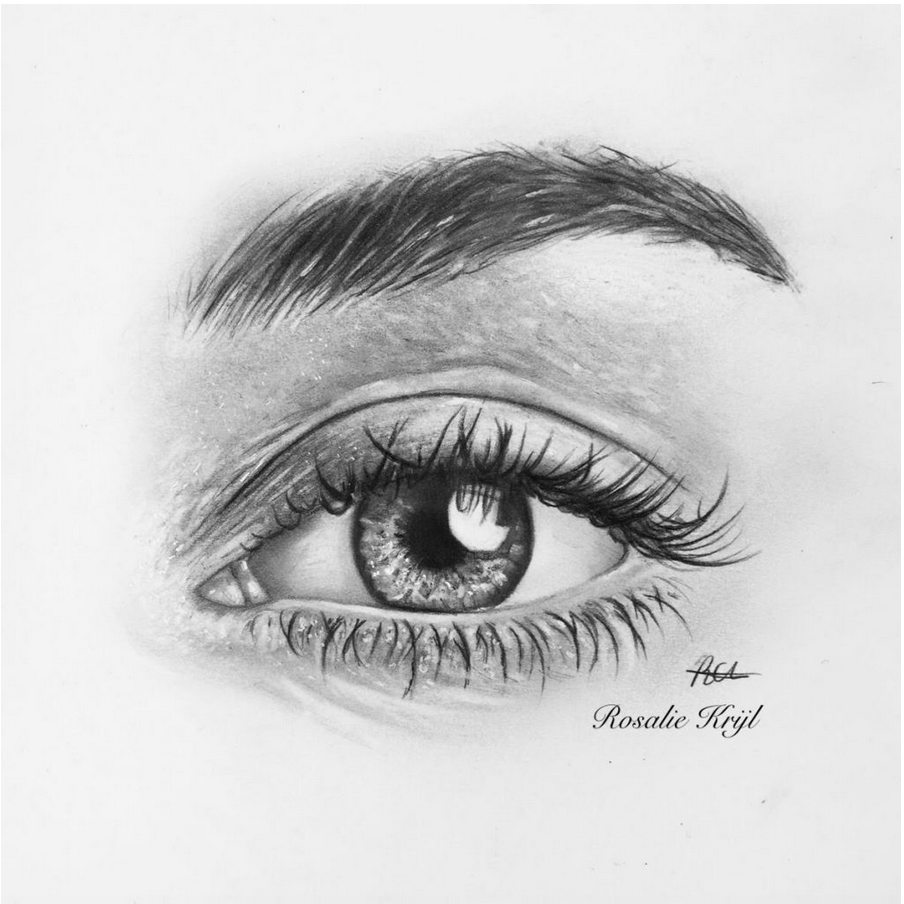
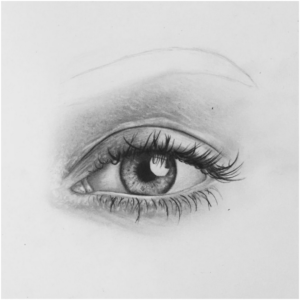
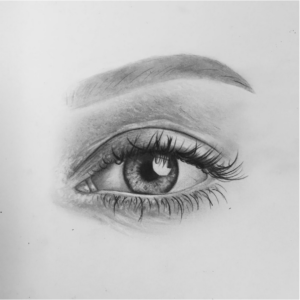
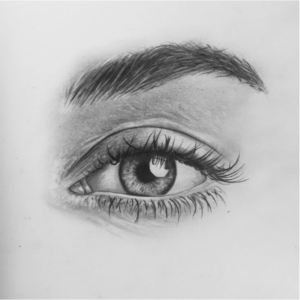
This is my end result:

Key tips:
- Use thick paper, a sharp pencil and a sharpened eraser with a sharp tip (pencil eraser, tombow eraser)
- Only start coloring when you are completely satisfied with your sketch
- Work in layers by gently leaving graphite on your paper every time, blending it and then applying details with a pencil or an eraser. Repeat this several times for the most blended and realistic effect.
- Notice that erasing is also actually drawing. Play with your pencil eraser and you will see endless possibilities!
- Practice drawing hair on a another sheet of paper or practise in your sketchbook. Find out which way works best for you.
This blog has become a bit longer than expected. I hope you learned something from it. Please show your results because I am very curious!
Love,
Rosalie
15 comments
Kate
3 January 2019 at 06:23this is awesome!! I have one related blog thought of sharing it
https://www.showflipper.com/blog/How-to-Draw-Realistic-Portraits-Step-By-Step
Rosalie Krijl
19 March 2019 at 14:56Thankyou so much! Will check it out!
hana
20 April 2019 at 08:16I love it
Mary
3 May 2019 at 00:35This was very informative! Love it
Jasmin
23 May 2019 at 21:28Thank you soo much!!!
Kamini
21 June 2019 at 08:20Thanks a lot. It was really helpful.
I personally feel that your second last picture looks better and more similar to the reference picture
Violet
29 June 2019 at 21:40Hey! Thank you so much. Could you maybe please do a tutorial like this one on a full body?
Anyways. I loved this.
khadija
7 September 2019 at 03:34nice
Pavla
5 November 2019 at 02:36Thank you so much! ? I had a project that involved humans and modern-day nature, and this helped me a whole bunch. Thank you again! ☺ï¸
youwillneverknowmehname
4 December 2019 at 11:12OMG IT WORKED YAYYYYYYYY CHECK IT OUT
Ankitha
8 June 2020 at 17:45Such a helpful tutorial; my first ever drawing of an eye actually came out pretty good, considering that I used two blunt pencils and an old, not-at-all-sharp eraser! I will keep perfecting the art, but thank you so much for such an easy-to-follow tutorial.
😀
eye
10 September 2020 at 08:44THANK YOU!!! THIS WAS SO HELPFUL! THANK YOU FOR POSTING SUCH AMAZING CONTENT OUT HERE WITH SO MUCH DETAIL. AND HONESTLY IT WAS SO MUCH EASIER TO FOLLOW THIS BLOG POST THAN A YOUTUBE VIDEO.
Queen Nefertiti
10 September 2020 at 08:45THANK YOU!!! THIS WAS SO HELPFUL! THANK YOU FOR POSTING SUCH AMAZING CONTENT OUT HERE WITH SO MUCH DETAIL. AND HONESTLY IT WAS SO MUCH EASIER TO FOLLOW THIS BLOG POST THAN A YOUTUBE VIDEO.
mart
19 November 2020 at 21:46I was hoping for a video but this works too
#PandaGirl
12 February 2021 at 02:08Thanks so much! I had trouble drawing a realistic-looking eye and this really helped me! Can you maybe do another tutorial on how to draw a whole body?