
Most hobby’s, such as drawing, arise out of curiosity and ambition. We all secretly dream to excel at something, don’t we? Besides the drive to be successful, it’s important that you’re passionate and enjoy working on your skill. Of course it is impossible to become a professional artist overnight. Maybe you’ve heard of the ’10.000 hours-rule of thumb’? In 1993, a Swedish psychologist Anders Ericsson claimed that 10.000 hours of consistent practice would be sufficient to become exceptional at a certain skill (1993, Psychological Review). Even though this research was not solid and got debunked by further investigation, Ericsson still made his point. I do believe in the very cliché phrase ‘practice makes perfect’, though this may be magnified by talent. In order to keep practicing, drawing needs so be fun, and getting nice results helps with that. This article focuses on How to start with drawing portraits and keep it fun.
Tips on starting to draw portraits
- Â Start easy and on small scale
As mentioned before, obtaining the art results you envision can help staying motivated. Therefore, start simple! Starting with a complete portrait might be a bit over-ambitious. I started out by first practicing to draw single features/elements of the face (mouth, eyes, nose, ears) and figuring out the basics about drawing lights and shadows (an article about light and shadows will follow later!).
- Use of reference
I recommend using a reference photo to draw from, especially if you’re new into realistic art. Funny thing is, most famous realistic painters that we know of probably did the same! They sat drawing outside with their canvas and paint brushes, painting the environment as close as possible to reality or doing art studies with real life subjects before embarking on a new piece of art. Moreover, you need to know how an object, e.g. an eye looks before you can draw realistic eyes from memory. Every eye is unique, but the basic anatomy is mostly the same for all eyes. By drawing from reference, you become familiar with the anatomy after which it will get easier to draw from memory.
When thinking of using references, we should not forget using YouTube. Drawing is not an instinctive skill that we need to survive the world but is learned. We learn best by imitating. With the invention of the internet, is has become very easy to find help online. Endless options for drawing tutorials can be found on YouTube and on sites such as Skillshare or DeviantArt. These tutorials are perfect to discover new tips and techniques and allow you to directly see how professional artists perform. Out of all things, YouTube might have had the largest influence on my personal improvement.
- Front view photos
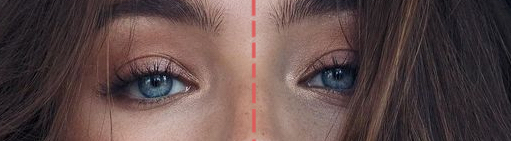
When choosing an appropriate reference photo (or when drawing from mind) the easiest angle is to pick a front view. One of the most important things we find in nature issymmetrie; which you can also be found in the human body. Objects such as the nose, mouth but also the complete head have a symmetry axis. Which means that if you draw an imaginary middle line from the top. When choosing an appropriate reference photo (or when drawing from mind) the easiest angle is to pick a front view. One of the most important things we find in nature is symmetry; which you can also be found in the human body. Objects such as the nose, mouth but also the complete head has a symmetry axis. Which means that if you draw an imaginary middle line from the top of the head to the chin, the left and right from this line are mirrored images (see Image 1). Because of this natural symmetry, drawing portraits from a front view is a lot easier than from an angle.
How to use the symmetry axis smartly:
The ‘middle symmetry line’ can help you to put the various features of the face that are located underneath each other, really underneath each other. For example: the tip of the nose, the middle of the lips ‘’cupids bow’’ (the tope edge of the upper lip that has the shape of a double curved bow!) and the small gap between the teeth are often found on the same line (see Image 1). Funny thing is, the asymmetry that is found according to the middle line, is what makes the person look more unique. This middle line it also a convenient tool to estimate or measure these asymmetrical features (by estimating the distance to the line). Also, drawing extra guiding lines right-angled onto the middle line can help you draw features correctly and estimate asymmetry (see Image 2).

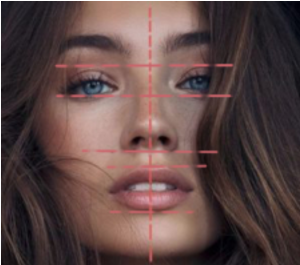
to understand asymmetrical features. Here you can see that her right eye is slightly higher
than her left, though her nostrils and upper and bottom lip are fairly symmetrical.
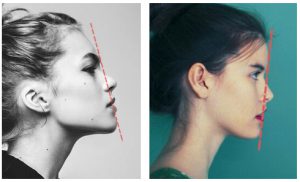
If you already have mastered drawing front faced portraits, here’s a tip for side view portraits: you can draw a straight line from the forehead to chin, after which you can estimate the distance from the line to the nose (see Figure 2).
- Basic shapes
Whenever I draw something, I like to simplify complex structures back to basic shapes. This way you’ll prevent focussing on details instead of the complete picture. Any object (e.g. a nose) can reduced to basic 3D shapes such as cubes, spheres, pyramids and cylinders. When you understand how these shapes together form a more complex form, it will also be easier to understand where to correctly add shadow and highlights. Figure 3 shows a sketch of a nose made out of simpler basic shapes. After that, the areas of shadow are added and blended to soften harsh lines. To complete the look, the darkest shadows and highlight details were added.
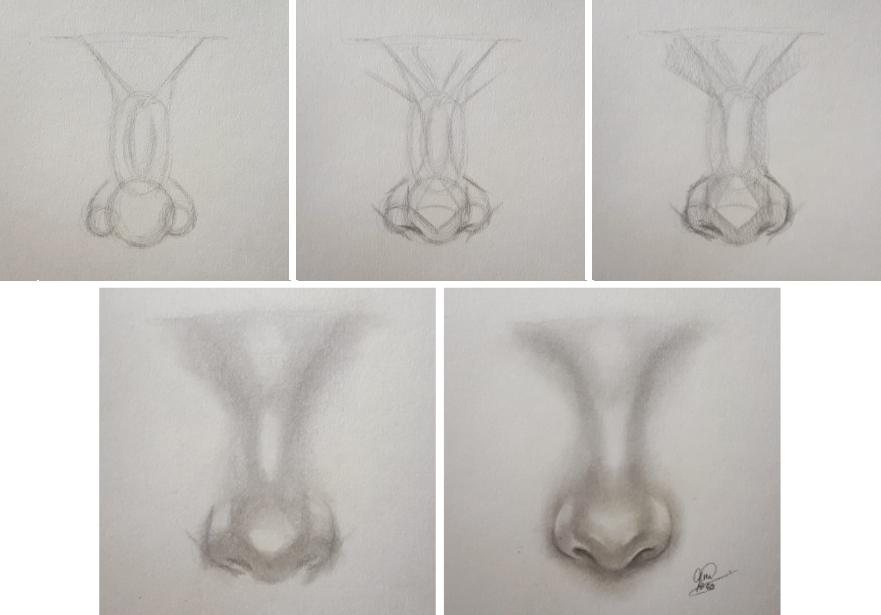
shape and make it easier to put down shadows and highlights correctly.
- Materials
You don’t need the fanciest equipment to start drawing portraits. I will not deny that heavier, qualitative paper and a nice set of pencils are easier to work with then a piece of print paper and an Ikea pencil, but it certainly does not have to be expensive either! In my opinion, you’ll need at least a piece of paper of 120gr/m2, a 2H, HB and 3B pencil, an eraser and some blending materials (such as brushes, q-tips or cotton rounds). A quick visit to your local art store and you’re good to go!
To succeed in a new hobby, it has to stay fun. Start simple and slowly increase difficulty over time. Good luck, and remember: practice makes perfect! 😉
7 comments
Kaela
8 June 2018 at 08:16Thank you for taking the time to write this! It’s simple and easy to understand but really helpful!
Annelies Bes
11 November 2018 at 20:16Thank you for your lovely feedback!!
Pingback:
Mei naa
3 November 2018 at 15:53Thank you for your tips and explanations. Its really helping me
Annelies Bes
11 November 2018 at 20:15I’m happy to hear it helped you! 🙂
Charity
23 February 2019 at 03:32What i do not realize is in truth how you’re now not
really a lot more neatly-preferred than you might be
now. You are so intelligent. You know thus significantly with regards to this topic, made me
individually consider it from numerous numerous angles.
Its like men and women are not interested except it’s one
thing to do with Woman gaga! Your own stuffs outstanding.
At all times deal with it up!
jeanettem
1 December 2020 at 19:01this isnt helpful it just has thee steps i need more